 "Sweet Trav" (thespunbearing)
04/26/2016 at 20:35 • Filed to: None
 11
11
 20
20|
"Sweet Trav" (thespunbearing)
04/26/2016 at 20:35 • Filed to: None | 11
| 20 |
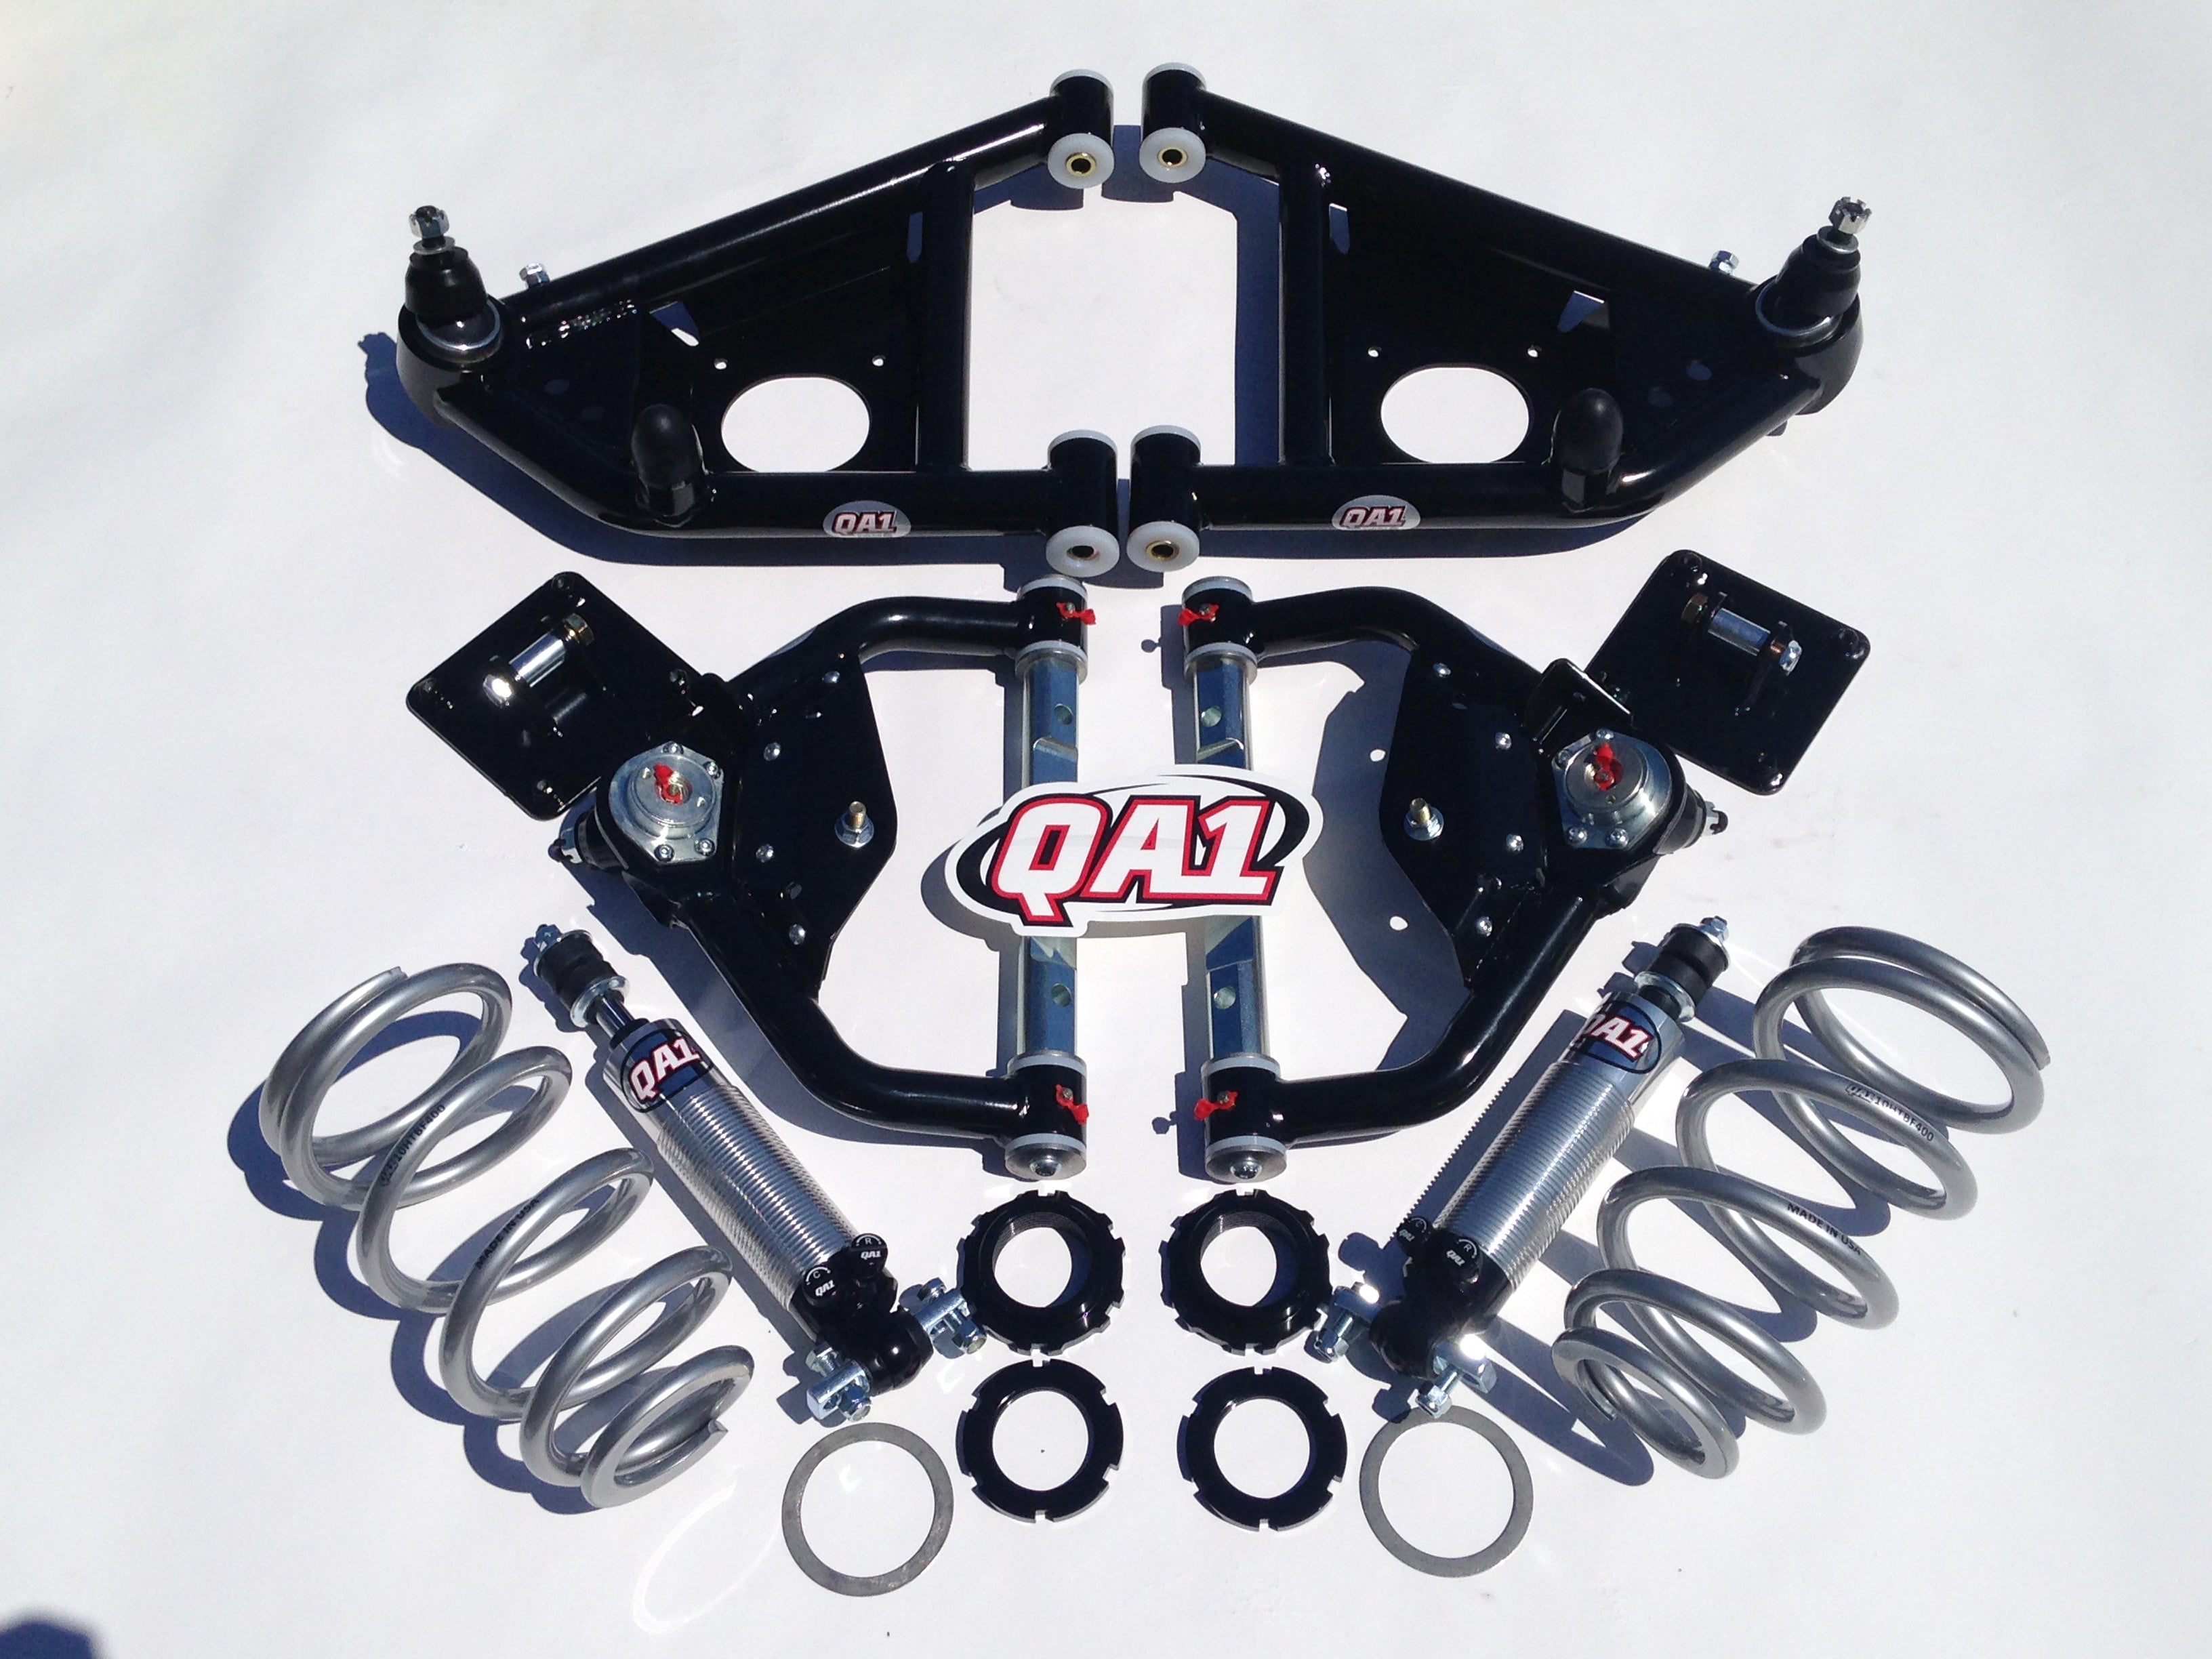
Well, after much deliberation, !!!error: Indecipherable SUB-paragraph formatting!!! as it fits into my strategy for the car. The kit consists of a front coilover double adjustable shock kit, front tubular upper control arms, front lower tubular control arms, larger diameter hollow sway bar, rear adjustable upper control arms, boxed lower control arms with poly-graphite bushings and a rear coilover double adjustable shock kit. I also purchased a new steering gear box, all new tie rod ends, center link and idler arm from Proforged and a rear shock mount brace to keep the rear frame rails from twisting torsionally.
The kit came in wonderfully packed from Summit over the course of a week and I loaded it up along with many of my tools and some working clothes and drove the car about an hour north by northwest of my house to my parents place in the “Thumb” area of Michigan two Thursdays ago. I used a vacation day for Friday and had to race on Sunday. As many of you know, I initially built this car with my dad about 11 years ago and I wanted to do this next major step in the evolution of the car with my dad.
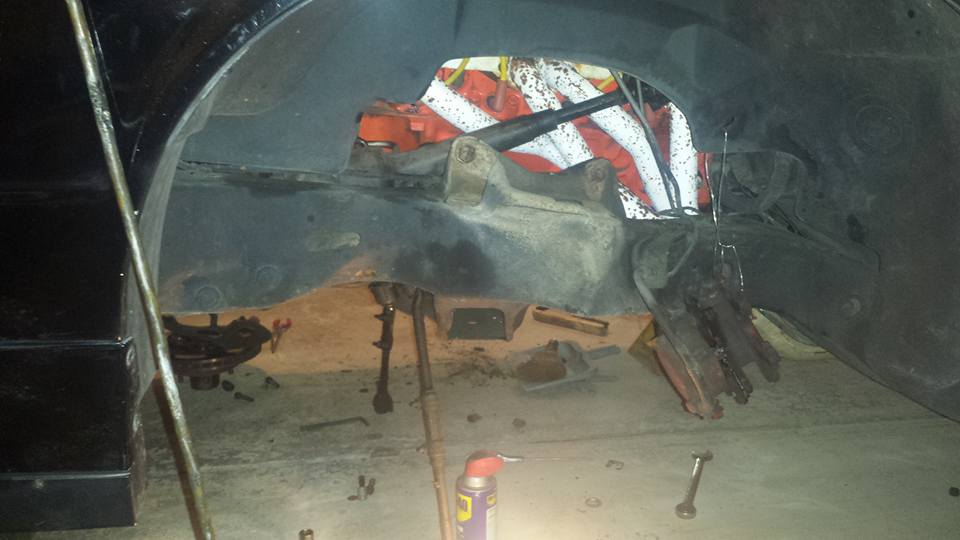
The first step was to get the car in the air and the wheels off:
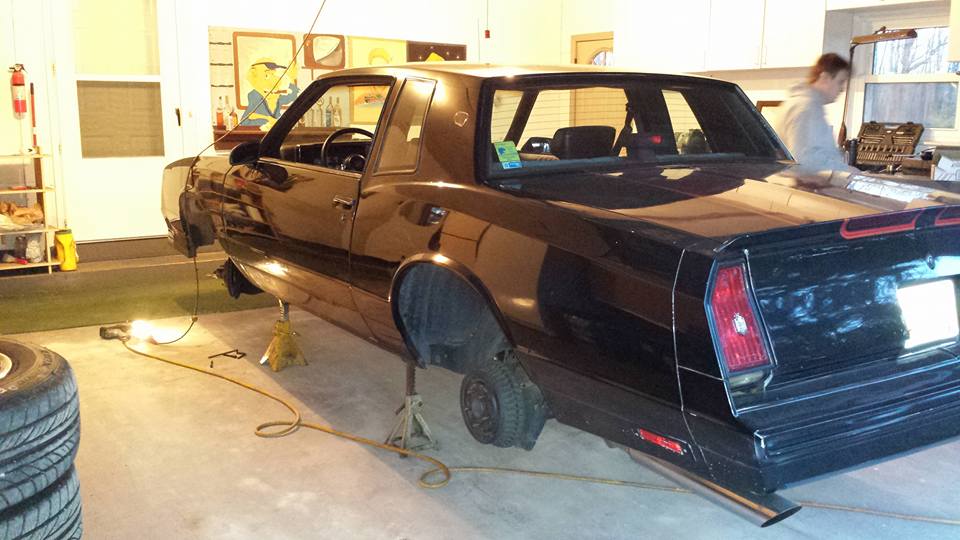
Next, we needed to remove the front calipers from the spindles:
Here you can see them off and hanging by a bit of bailing wire so there is not a lot of tension on the brake hose. After this, it was time to remove the dust covers on the hubs, remove the cotter key and crown nut on the spindle to pull the bearings and hub off, then three 11mm bolts to take the dust shield off.
Next we removed the tie rod ends, and popped them out of the spindle with a handy tie rod puller tool. After this it was was upper shock nuts and lower tie bar bolts for the shocks to get them clear from the car. Then the crown nuts and cotter keys for the lower ball joints, we then jacked the lower control arm up, detached the ball joint, and lowered the jack holding lower control arm down slowly, releasing the spring tension without the use of a spring compressor. After this we removed the upper ball joint from the spindle. With the spindle free it was time to clean up and repaint the spindle and dust shield flat black.
Next we could move onto the control arms. Very simple disassembly, two 18mm bolts for the upper control arm cross shafts (saving the shims and marking them for each location front and rear) and two 18mm through bolts at the attachment from the lower arm and the front K-member. With these gone, I could line up new and old side-by-side for a photo.

With both sides of the front suspension off the car, we decided to call it a night at around 12am on Thursday.
We left the car like this for the night and got a few hours rest for a long day of wrenching on Friday.
Friday morning we removed the steering box, tie rod ends and idler arm. Then was the fun part, putting new shiny pieces on the car.
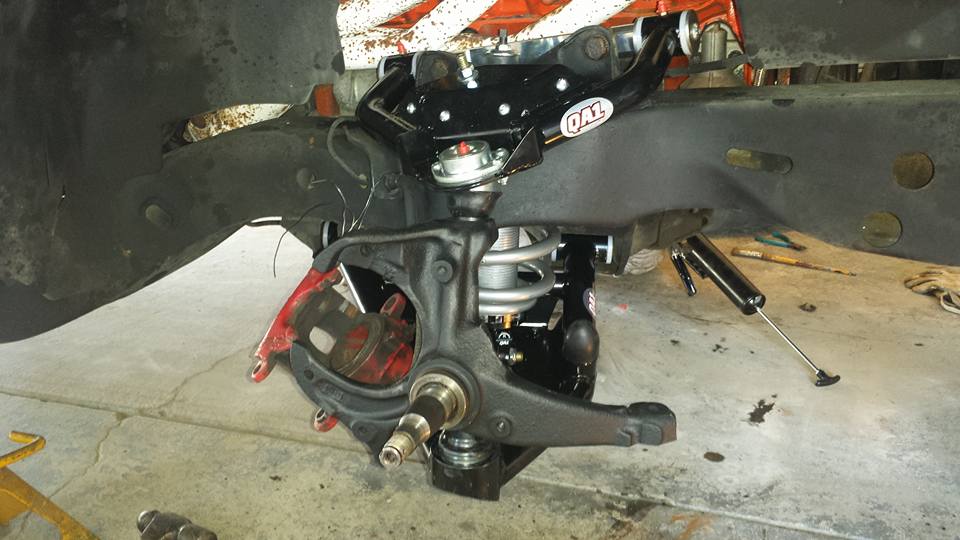
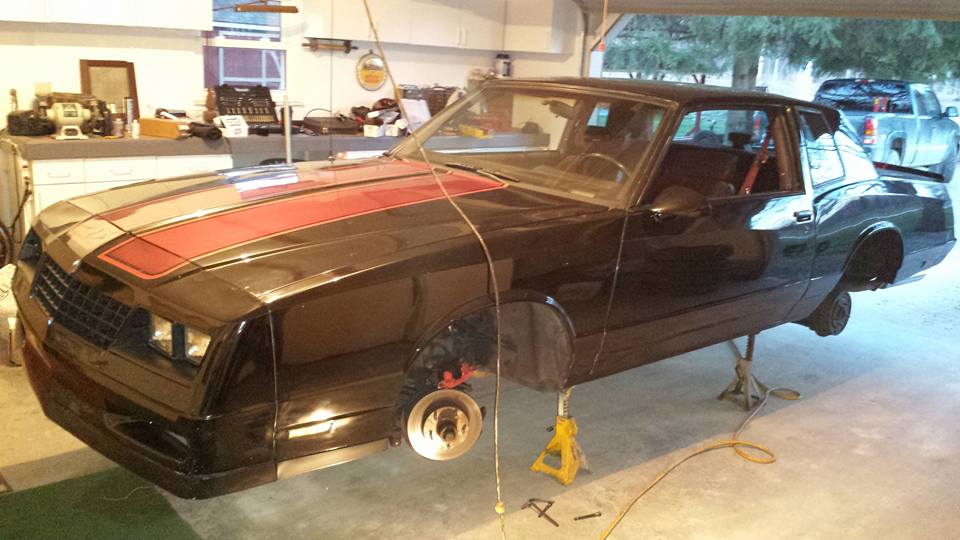
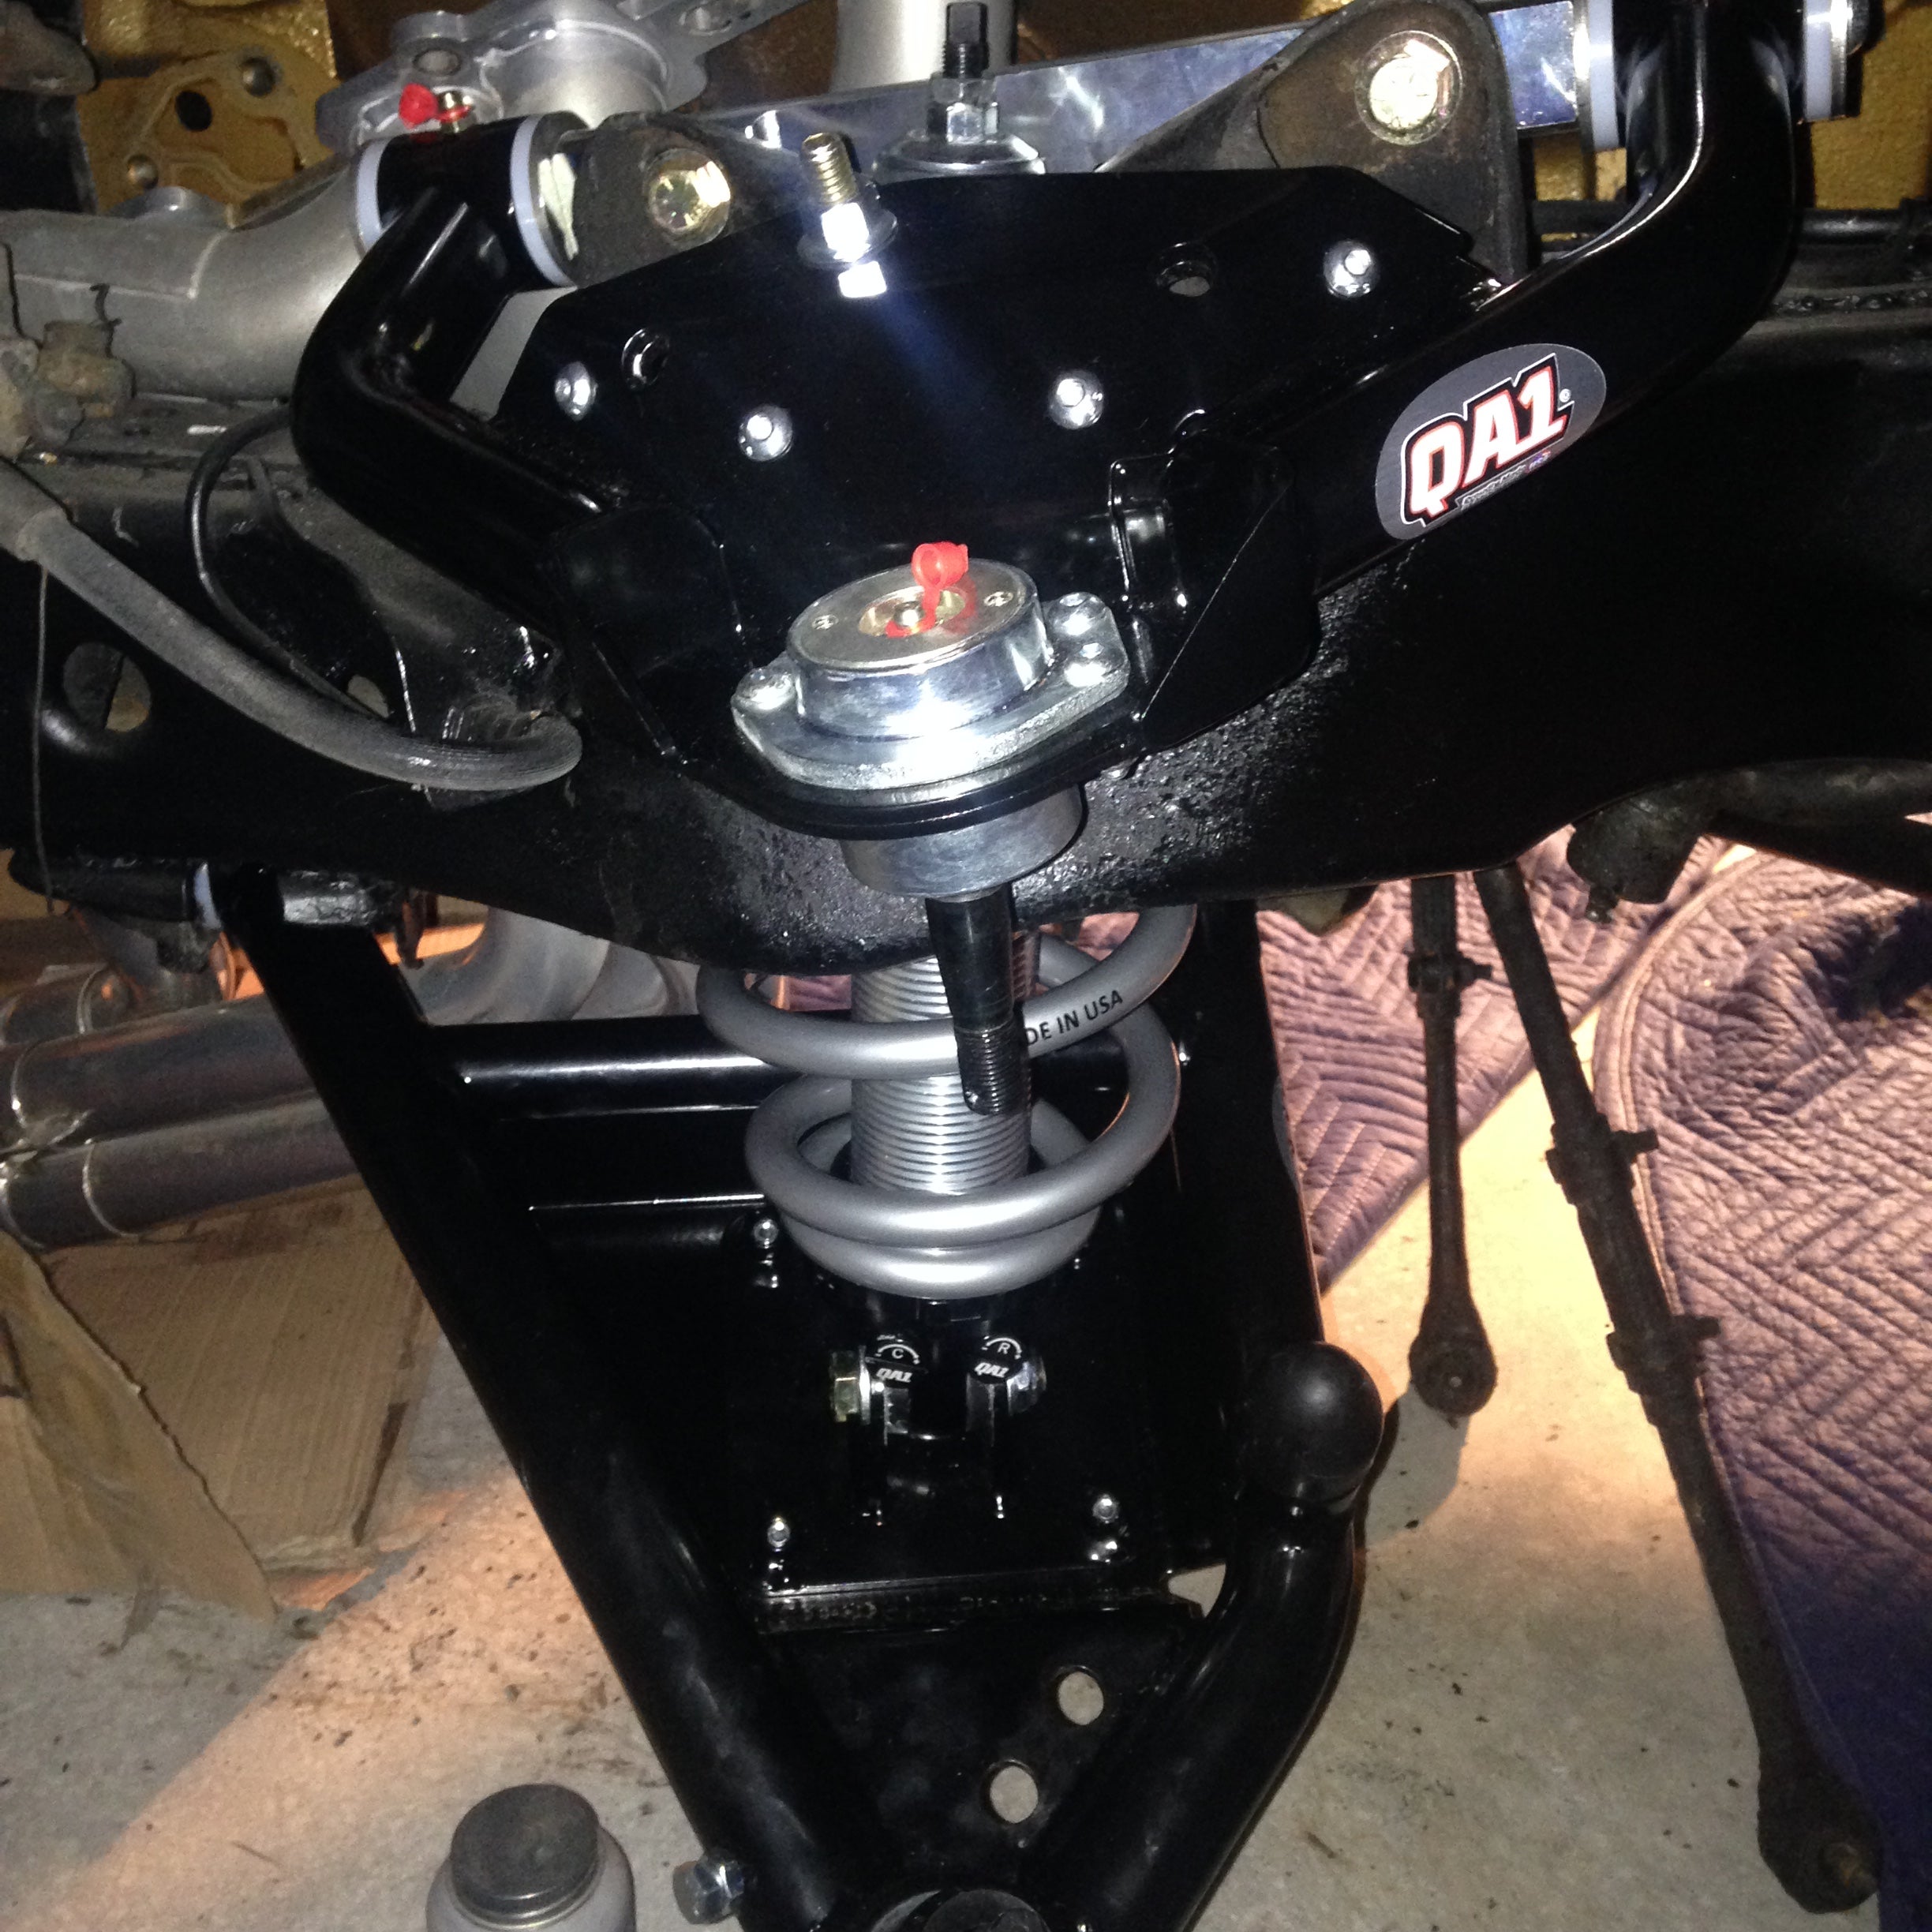
Here it is with the new uppers, lowers, and front coilovers.
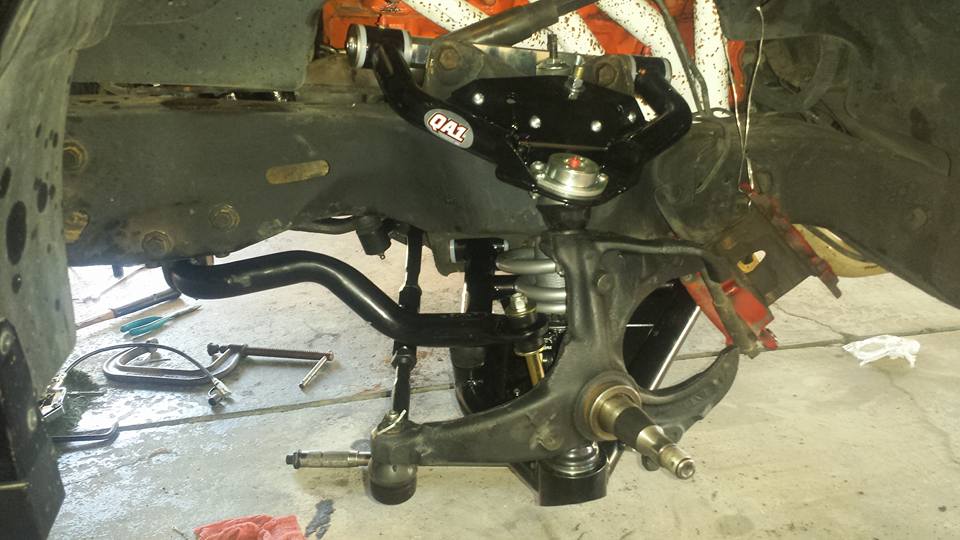
And here it is with the new tie rods, and steering box. Note sway bar installed upside down (realized this once we put the car down on the ground).
We got the front buttoned up and started working on the rear.

Here you can see the factory coil and shocks. Two bolts attach the shock to the upper frame and a single large diameter bolt holds the shock onto the axle. With the rear shocks removed we placed a jack under the center section of the rear axle, lowered it and let the axle droop down so we could simply pull out the rear springs.
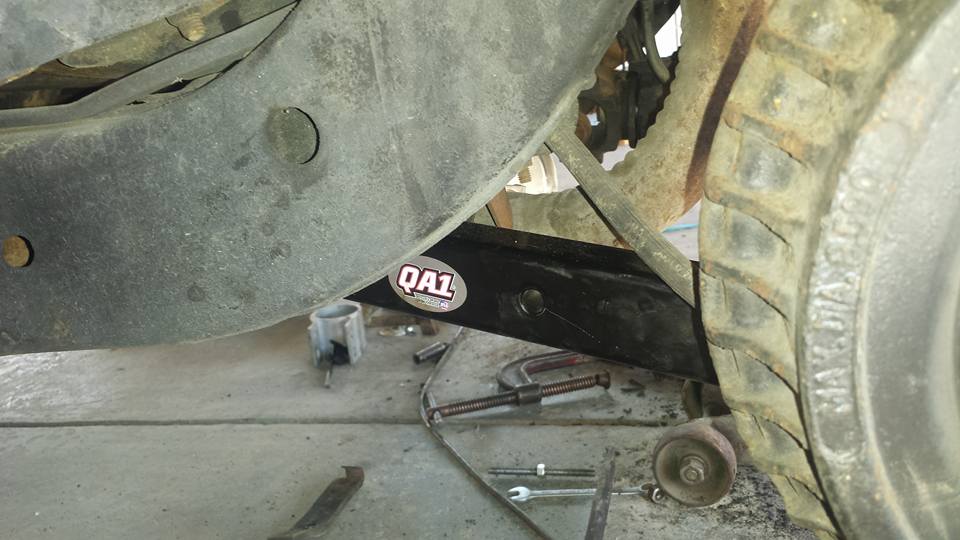
To install the rear shocks we had to drill out the two mounting holes in the frame to 3/8". We installed the upper shock mounts (now a separate bracket) and the rear shock brace, but didn’t install the coilovers so we would have room to work with the upper and lower trailing arms. This was the beginning of the hardest part of the project. Due to the location of the exhaust, getting a good hold on many of the attachment bolts for the uppers was next to impossible. We spent two hours and an innumerable amount of swear words on a single bolt due to the fact that we couldn’t cleanly get it with a boxed end wrench and had to use an open end. The lowers weren’t so bad but there were some strange angles that took some extra effort, also due to the placement of the exhaust, I couldn’t install the lower control arm mount to frame brace, this will be something addressed later when the exhaust is re-done in 3".
Here you can see the driver side lower installed:
The next step with the uppers was to remove and replace the bushings located in the upper part of the center section of the differential. To remove them, we used a 5/16" drill bit to drill rubber out of the bushing until it debonded and came out of the outer can that was pressed in the housing. We carefully cut the can with a sawzall, and then bent the can in on itself to remove it from the housing. To install the new bushings we put them in the freezer, lubed them up with some super lube, and hammered them in with a dead blow hammer.
We installed the new upper control arms and called it a night at 1 am on Friday.
Early morning on Saturday we started back up working, knowing that I had to have the car to the alignment shop by 3pm to have it adjusted and safe to race for Sunday.
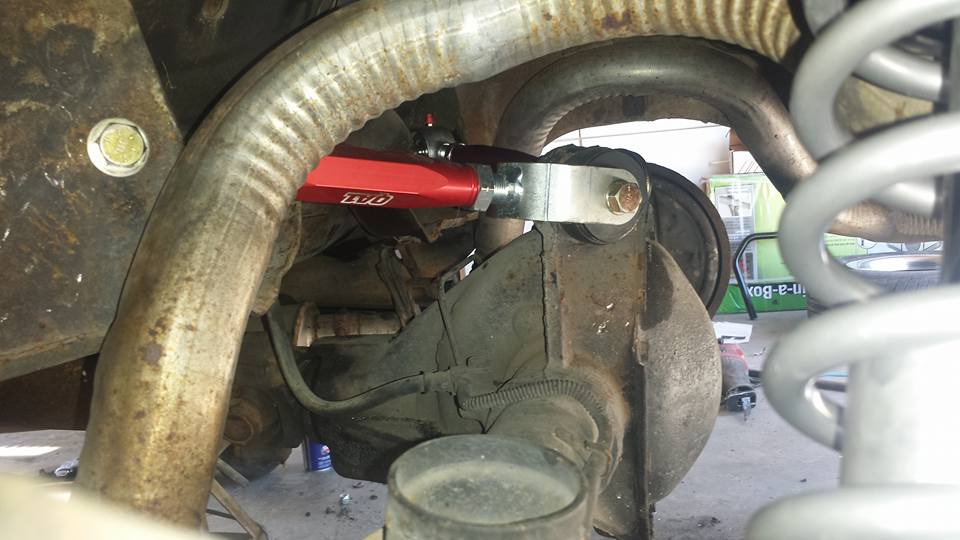
The rear sway bar was the last thing to install, and as it adjustable, you have to install the brackets to the bar that are then bolted to the rear control arms, a simple easy way to measure your distance is to use the old control arm and run a bolt through as the distance is the same between the new control arms and the old control arms.
We then installed the rear coilovers, which went together very easy, a single bolt through the upper mount, and then using the lower control arm attachment point and single bolt through where the old shock connected the coilovers were on and the suspension was buttoned up.
So we put the tires back on, and got the car back on the ground, started it up and the power steering which we forgot to re-fill groaned complained and then died completely, We assumed the reman box was bad.
Time was of the essence so I muscled the car quickly to the alignment shop where the toe, caster and camber where QA1 recommended for “aggressive” handling characteristics, none of which mattered if I didn’t have power steering.
When we got the car back from the alignment shop it was already past 5 and we knew that we would have to get the steering fixed, the first thing we did was put the factory steering box back on. No luck. PS was still dead, after trying to test the pump, I made the decision to just go get another one before the parts stores closed, the nearest store that had one in stock was about an hour away. We got the new pump, and with some improvisation got the old pulley off, and then installed onto the new pump. We filled the reservoir with PS fluid, started the car and crossed our fingers. It made the beautiful hydraulic groaning noise as it replaced air in the box with fluid and I had power steering once again.
Finally at 11pm on Saturday, 7 hours before I had to race, the car was done, or at least as done as it was going to get. I didn’t even have time to wash it before I raced the next day. Even if I would have had time, I was too exhausted to wash it anyways.
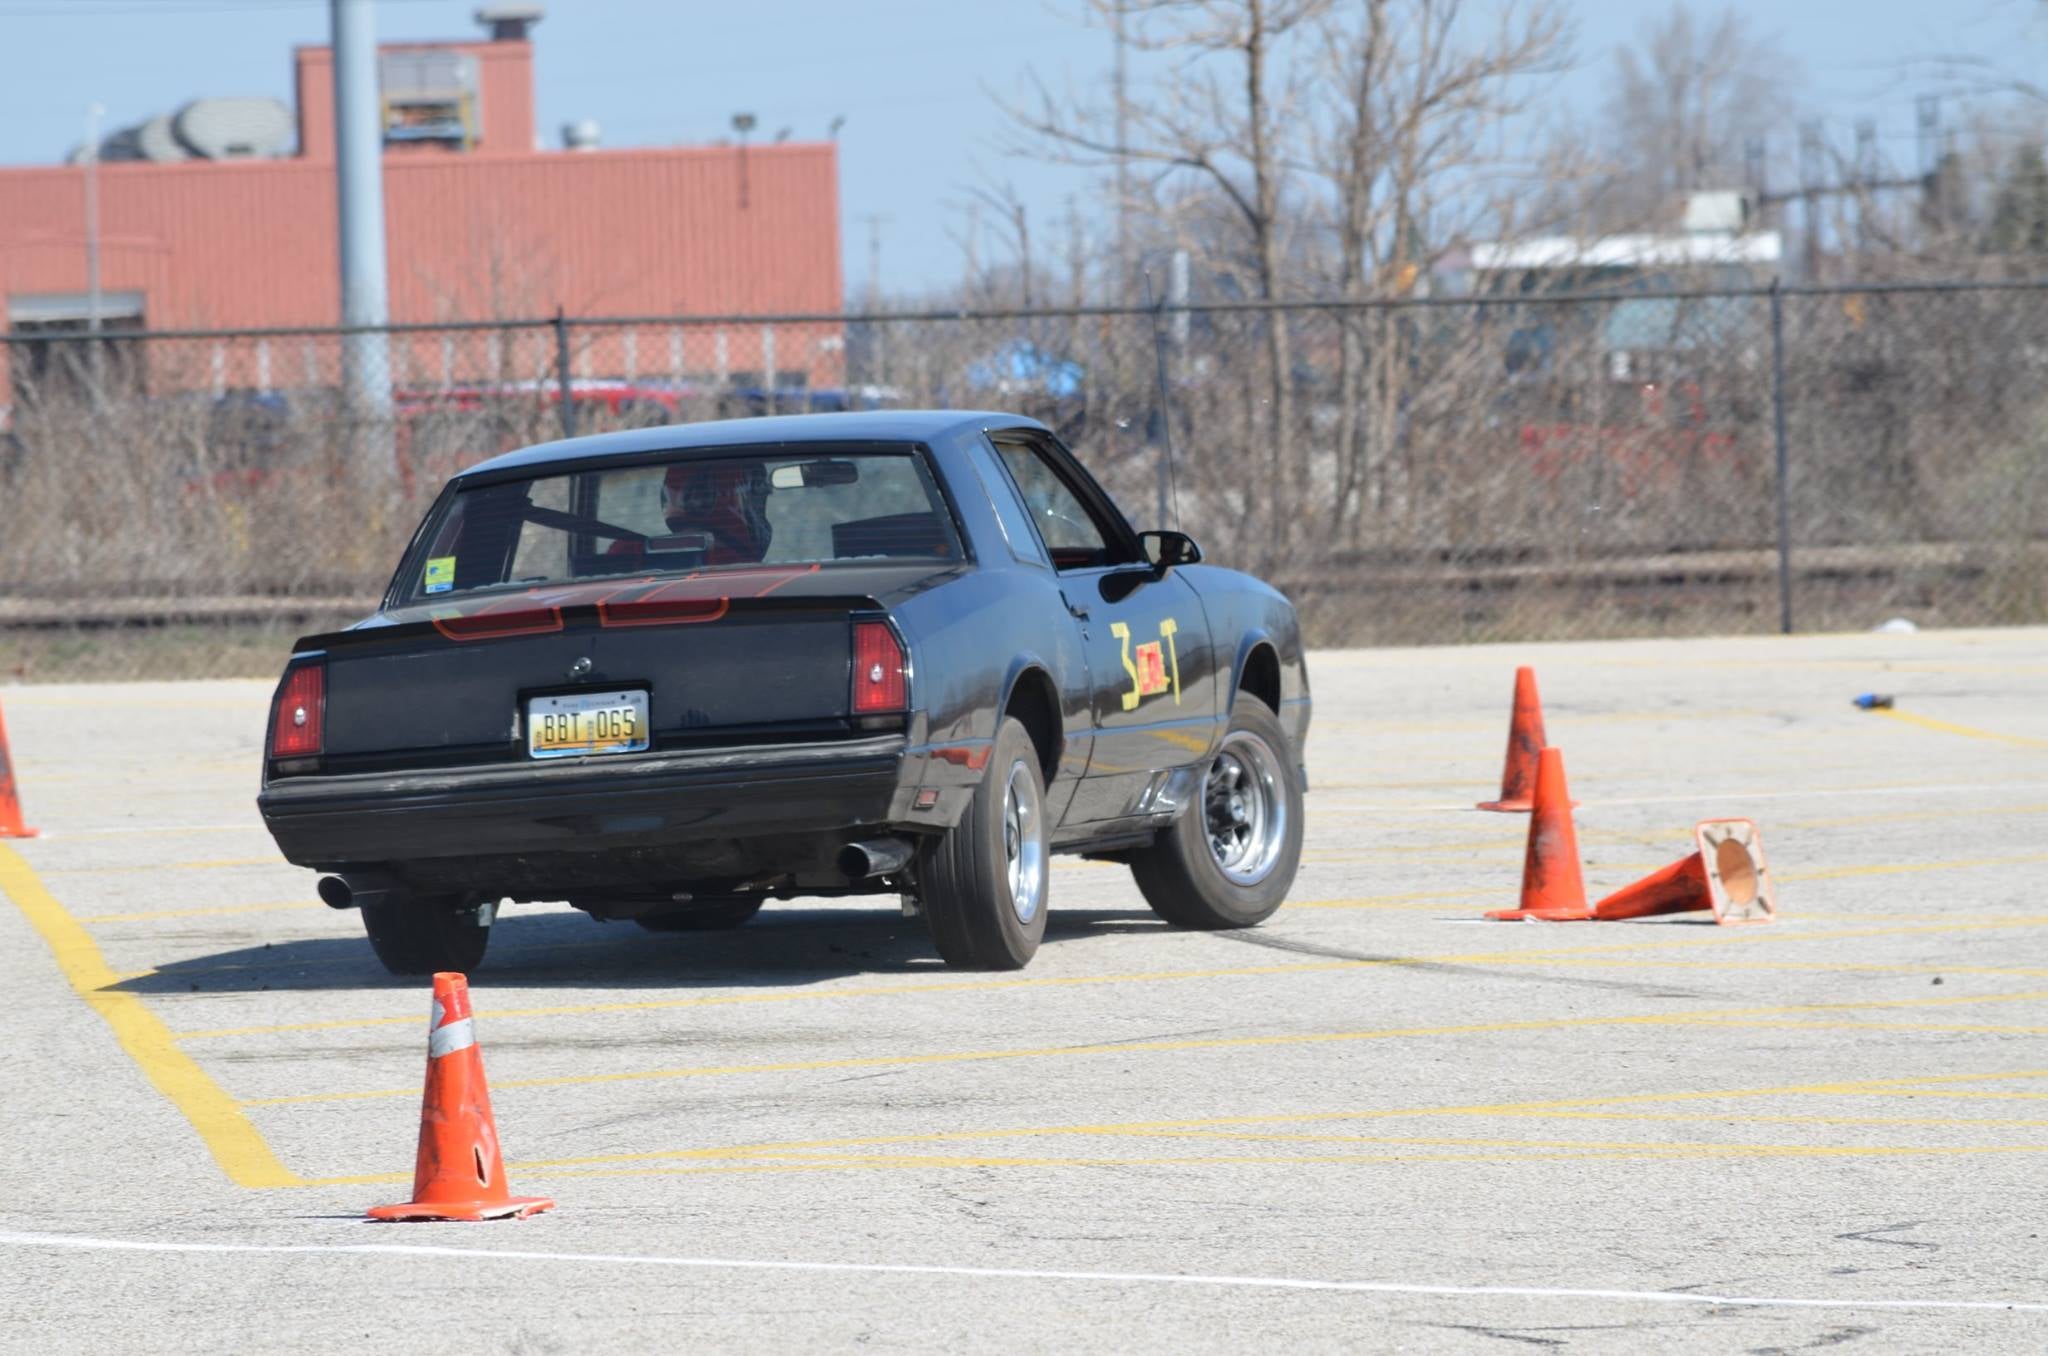
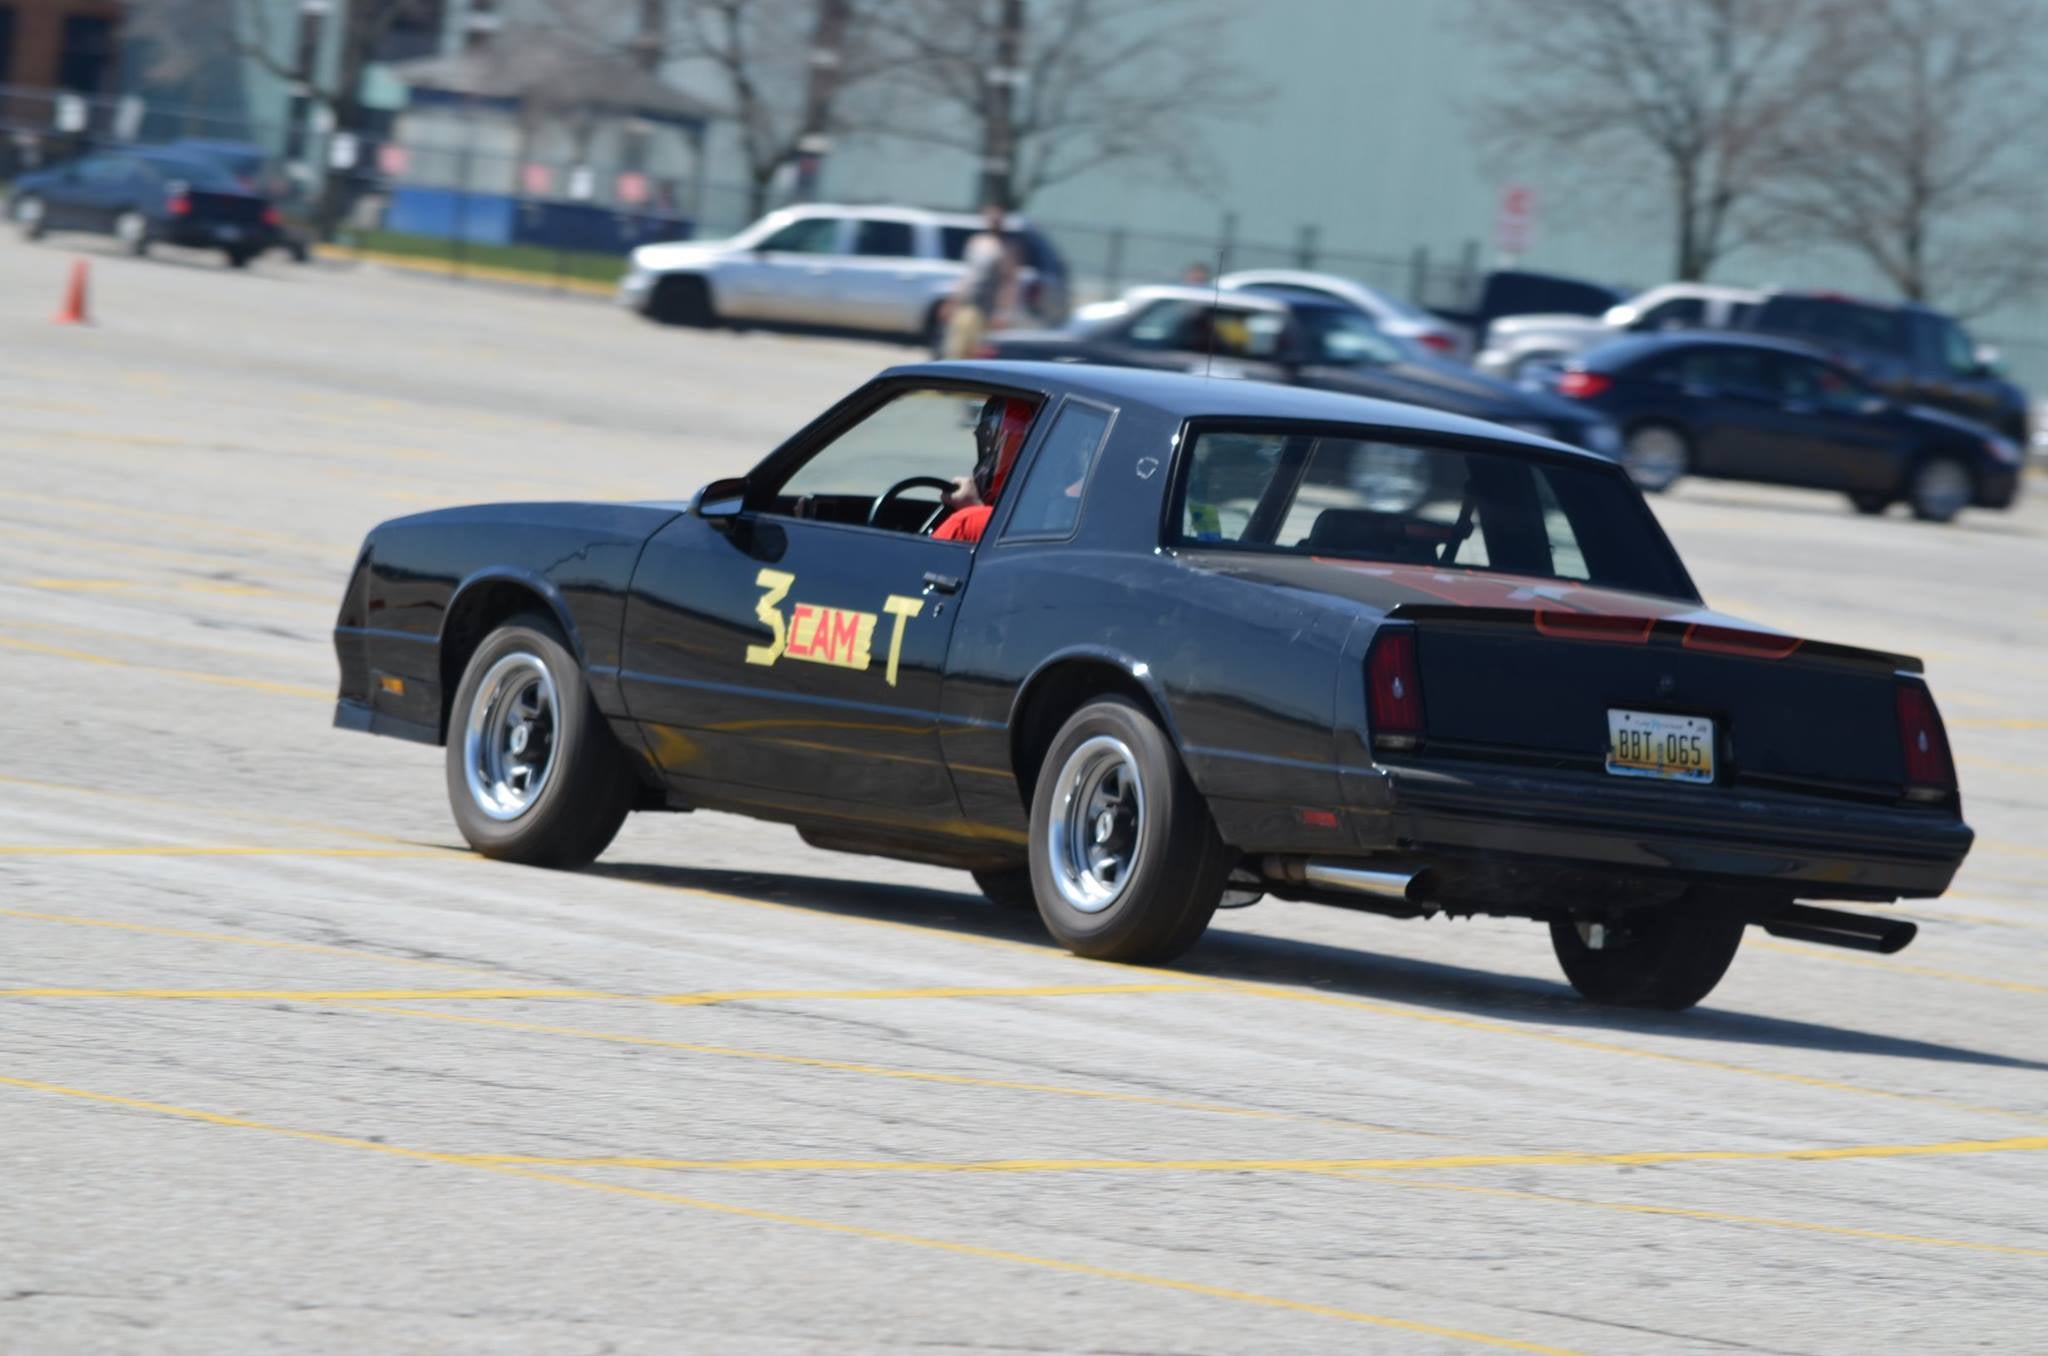
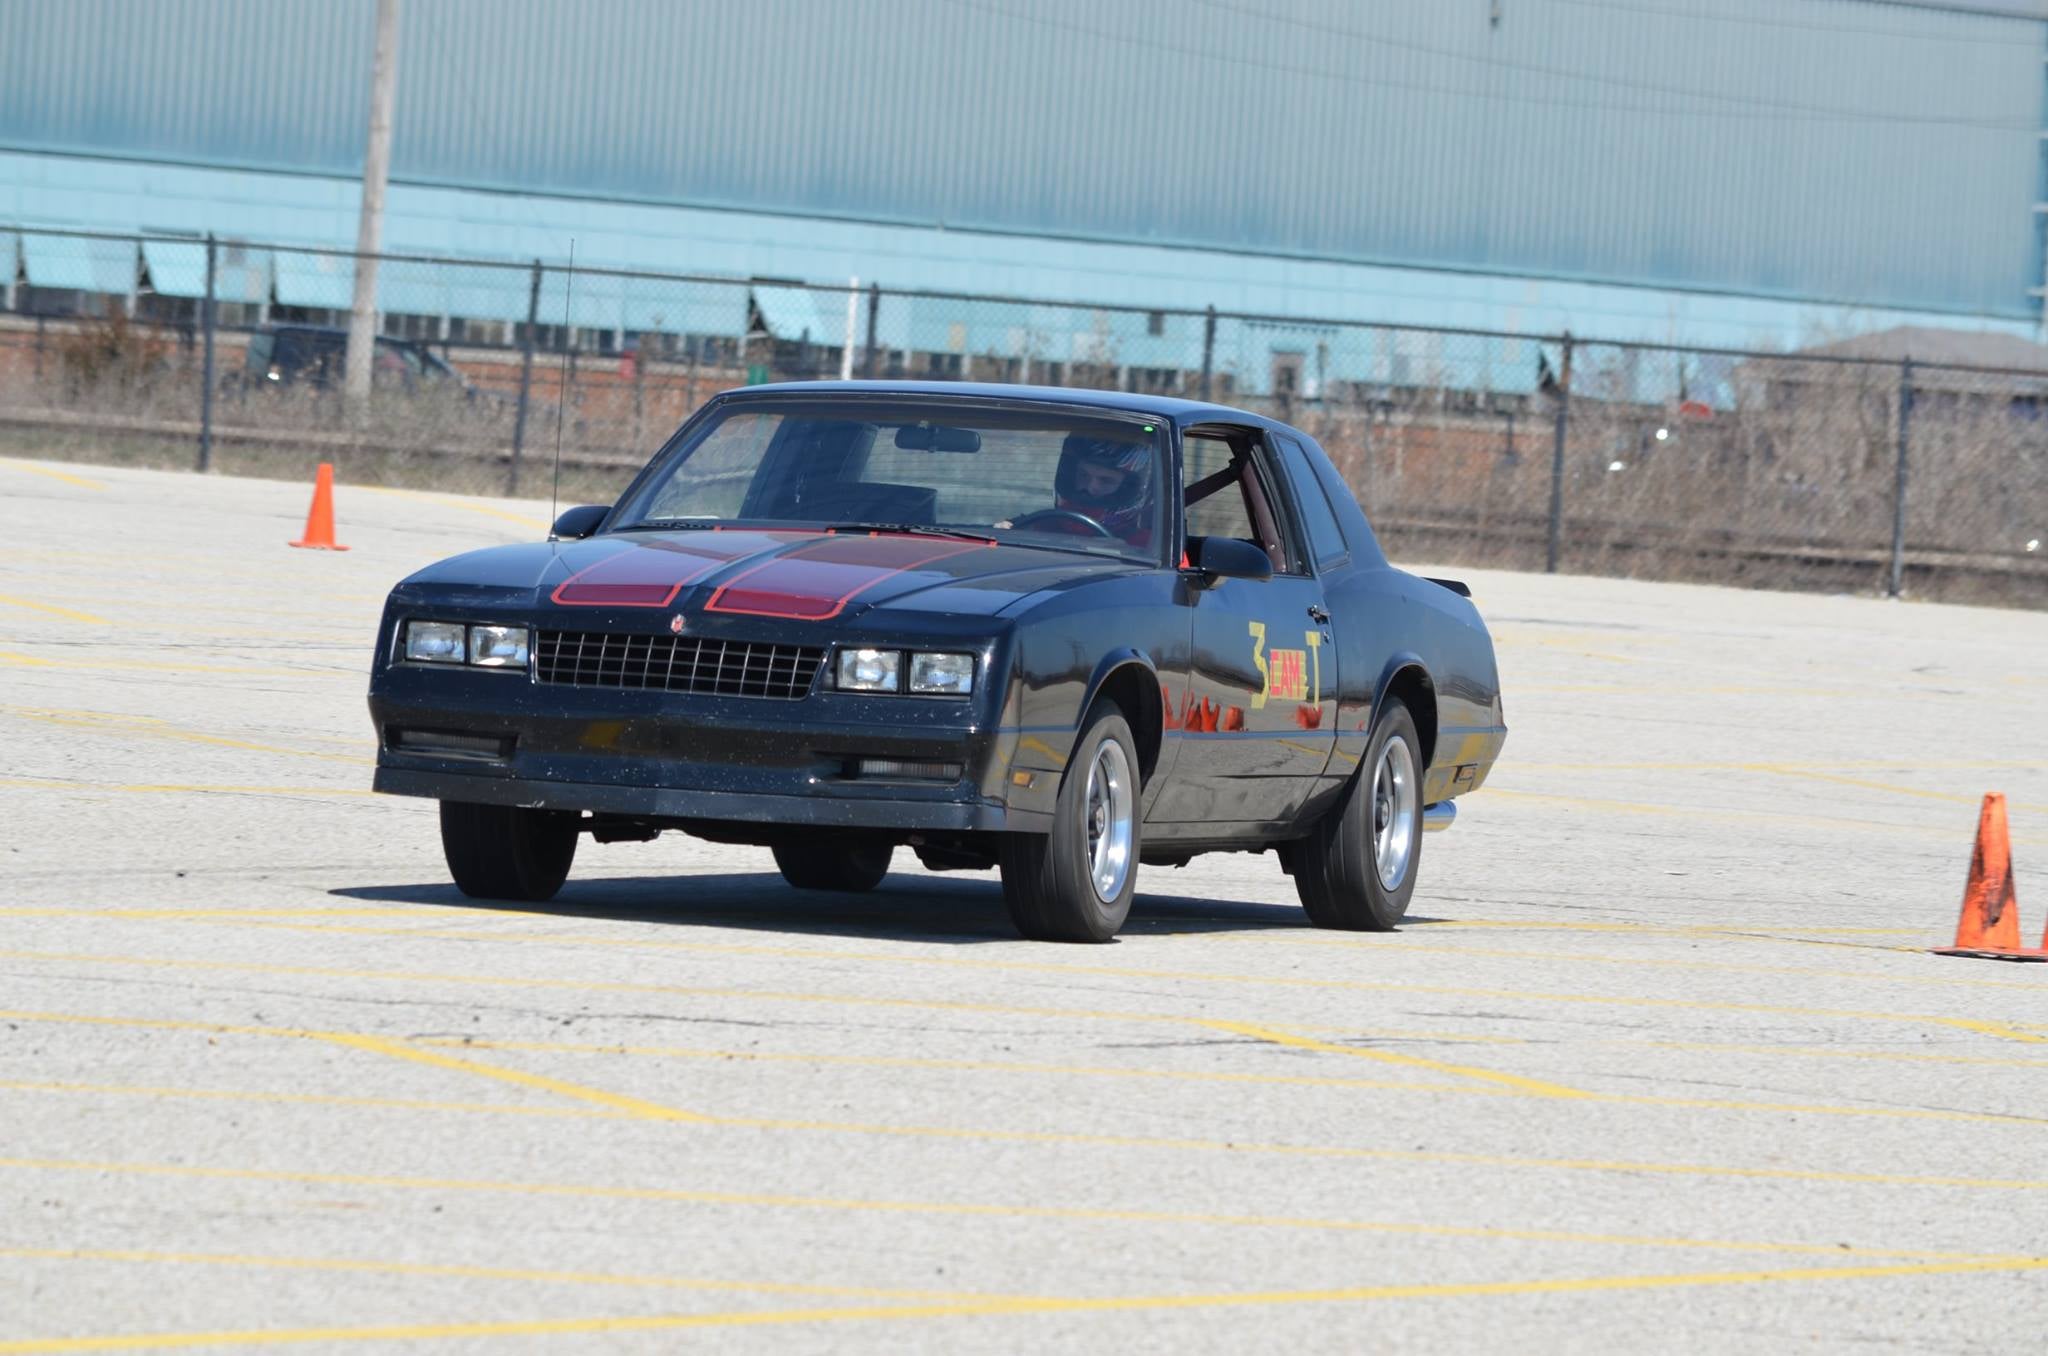
Here are some before pictures from Autocross on the old suspension:
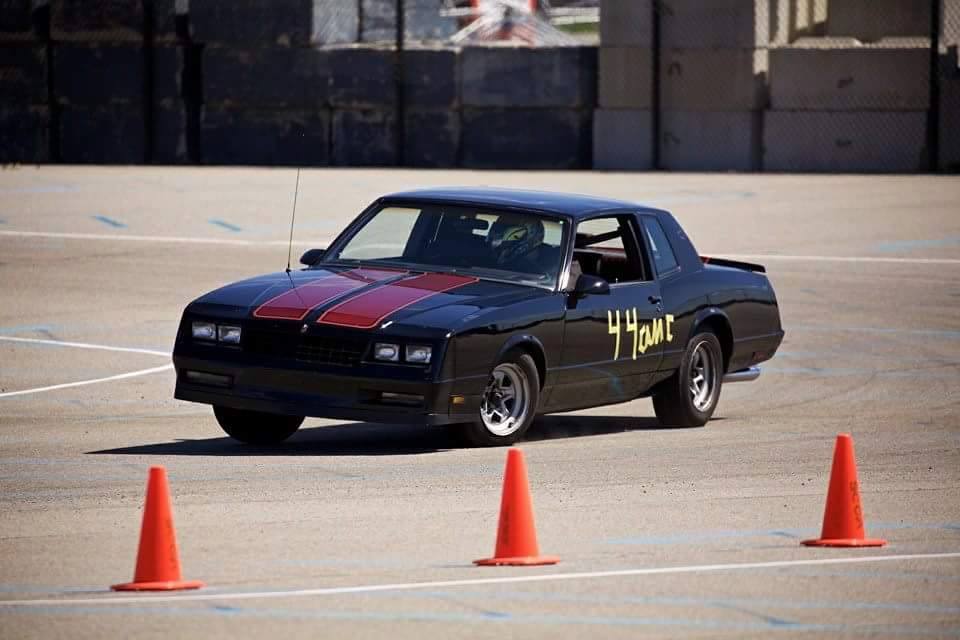
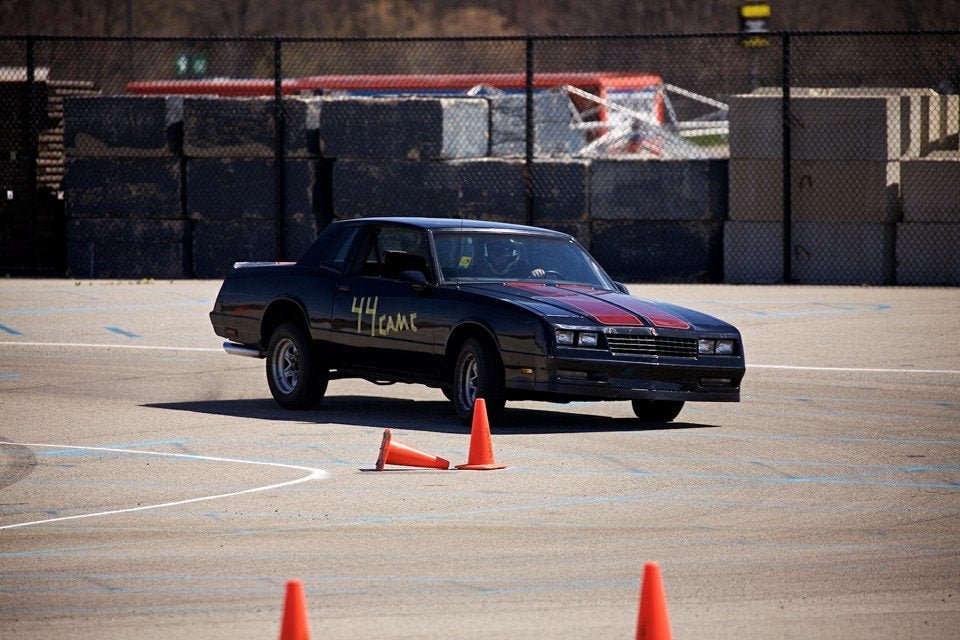
And now with new suspension
And here is a video of my fastest run:
!!! UNKNOWN CONTENT TYPE !!!
The car is much more composed and stable, the steering is still a bit vague and I have a solid steering intermediate shaft on order to help with that.
I also purchased some new wheels and tires (only two of which have been delivered thus far). Here is a picture of me test fitting them in the front to ensure that they don’t rub at full lock.
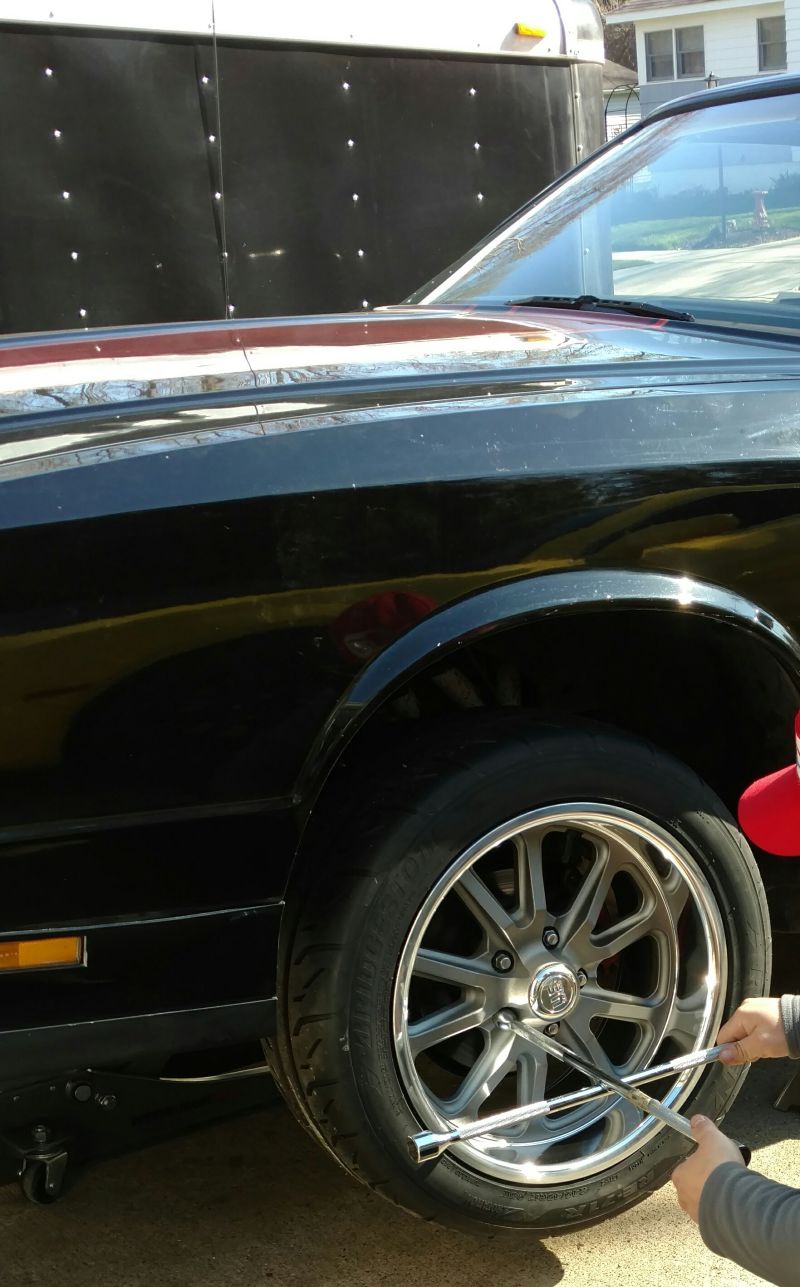
17x8 US Mags Rambler U111's with 245/45/17 Bridgestone Potenza RE-71'rs should be a huge upgrade from my 215/65/15 Falken’s
Overall, the front doesn’t sit as low as i would like, so a two inch drop spindle is probably in my near future, along with a front chassis brace to connect front two frame rails together, and an oil cooler.
I can’t wait for my next opportunity to Autocross this car on May 15th.
 RamblinRover Luxury-Yacht
> Sweet Trav
RamblinRover Luxury-Yacht
> Sweet Trav
04/26/2016 at 20:48 |
|
I’ve got QA1 springs and coilovers on the front of my Ranchero, as they were the best option for an 11" setup with a 400lb/in spring. Haven’t tried them yet, obviously, but I like what I’ve seen.
 Birddog
> Sweet Trav
Birddog
> Sweet Trav
04/26/2016 at 21:09 |
|
Awesome machine. Can’t wait for a run with the new shoes!
That QA1 stuff is something aint it?
 yamahog
> Sweet Trav
yamahog
> Sweet Trav
04/26/2016 at 21:10 |
|
obviously everything turned out great but in the future let’s agree to avoid taking on such extensive projects with such tight deadlines :P
|
Sweet Trav
> yamahog
04/26/2016 at 21:14 |
|
Never Again.
 sdwarf36
> yamahog
sdwarf36
> yamahog
04/26/2016 at 21:38 |
|
Yea-what do think this is-reality tv?
 Speed
> Sweet Trav
Speed
> Sweet Trav
04/26/2016 at 21:50 |
|
I couldn’t help but laugh because I just finished up a very similar project on our ‘86 Cutlass today. QA1 upper and lowers with a coilover set up in the front and Dick Miller upper/lowers out back with QA1 adjustables. This one is a drag build.
Very nice work, sir. Let me know if you ever need anyhing else for your Gbody. I work for Dick Miller Racing and we’re vendors for a dozen different outfits like Comp, TCI, Moroso, QA1, ect ect.
|
Sweet Trav
> Speed
04/26/2016 at 21:59 |
|
Well the next big project is going to be an LS swap. Thinking 6.0 Iron block with L92/LS3 heads. 450-500 hp range.
And with that I will surely need a beefier rear end 7 5/8" rears dont tend to last too long.
|
Speed
> Sweet Trav
04/26/2016 at 22:09 |
|
Word. We just sold the old 9" from that car for dirt when the Moser went in. Even an 8.5 Gbody rear will serve you well, especially if you’re mostly autocrossing it.
Speaking of LS.. FTW! My daily is a ‘98 Z28 and we just got a lead on a 5.3 for my brothers 2nd gen Firebird. My ultimate plan for the Camaro is to swap to an iron 6.0 and boost it to the moon.
If you wrangle a 6.0, don’t discount sticking with cathedral port heads. You can get a set of 243 heads dirt cheap (I’ve bought ‘em for $100 before) and will easily hit your numbers with a good cam.
 shop-teacher
> Sweet Trav
shop-teacher
> Sweet Trav
04/27/2016 at 00:07 |
|
Looking good!
 Frank Grimes
> Sweet Trav
Frank Grimes
> Sweet Trav
04/27/2016 at 01:56 |
|
those wheels are awesome and it must be awesome with all new suspension. Is that normal to have so much body roll?
|
yamahog
> Frank Grimes
04/27/2016 at 08:18 |
|
Yea, the stock gbody suspension had rolls for days.
|
Sweet Trav
> Speed
04/27/2016 at 09:06 |
|
Well the dream motor is a De-stroked 6.0 with a 4.8 crank, shaft mounted Jesel rockers and an 8600 rpm red line. But I think a simple 6.0 swap with some decent heads and a cam will suit the car fine.
|
Speed
> Sweet Trav
04/27/2016 at 14:11 |
|
Word! I always thought a modern LS rendition of the old DZ302 would be cool.
 Burn-Spaz1966-Burn
> Sweet Trav
Burn-Spaz1966-Burn
> Sweet Trav
04/27/2016 at 15:48 |
|
Nice, would it keep up with a new Camaro?
 uofime-2
> Sweet Trav
uofime-2
> Sweet Trav
04/27/2016 at 16:53 |
|
I bet slaloms are a lot less sketchy now.
What are your spring rates? It still looks like you move around a pretty good amount, of course with your chassis there may be little point in increasing them to much.
Those tires are going to take your car to a whole new level!
|
Frank Grimes
> yamahog
04/27/2016 at 17:55 |
|
it still looks like it rolls a lot after suspension work of course maybe you havent tuned it yet or its ok if it rolls.
|
Sweet Trav
> Speed
01/03/2017 at 15:01 |
|
Question for you, did you ever get the front of the car low? my car still sits way too high in the front.
|
Sweet Trav
> Speed
04/20/2017 at 11:27 |
|
What do you guys run for steering boxes? I’m trying to find one of those rare “670" boxes, but they seem to be out of stock everywhere. Turn one makes one, but they want 800-1000 for one.
|
Speed
> Sweet Trav
04/25/2017 at 15:39 |
|
We’re running an S10 manual box on my brother’s 80 Firebird and plan on doing the same for the 442. The thing is, being more of a canyon carver, I’m not sure that’s the ideal one for your application. We were focused on weight and simplicity.
I’m not familiar with the one you mentioned, but check this article out.
http://www.hotrod.com/articles/ccrp-0901-gm-steering-box-upgrade/
|
Sweet Trav
> Speed
04/25/2017 at 16:06 |
|
Heh, that article is why I bought a Camaro box, which proceeded to kill two PS pumps lol.